Heck Yeah Holiday Ham Bone Ramen

Ever since I’ve been making ham for holiday meals, I’ve been searching for recipes out there that utilize the leftover and delicious ham bone. I’ve tried ham and barley soup, ham and potato soup, ham and dumplings, and red beans and rice. All of these recipes have been great, and I’ve made each one multiple times. But after Thanksgiving this year, I went looking for a new recipe, and ended up modifying this awesome and extremely tasty ramen recipe on Mashed… and now I think it’ll be tough to top this winner!

Ingredients

  • 1 ham bone with a bit of meat
  • 2 tbsp canola oil
  • 1 medium red onion, diced
  • 5-6 cloves garlic, minced
  • 3 teaspoons fresh ginger, minced (or three frozen cubes of ginger from Target)
  • 10 cups of water
  • 1 tbsp Fish sauce
  • 3 tbsp Soy sauce
  • 5 tbsp Rice wine vinegar
  • 2 tbsp toasted sesame oil
  • 2 tbsp chili oil (ideally infused with lemongrass)
  • 2 limes – one juiced, one sliced for garnish when serving
  • 2 green onions, chopped
  • 4-6 eggs, depending on how many eggs you want in your bowls
  • 4-6 packages of instant ramen noodles (you’ll use the ramen noodles and throw away the spice packets)
  • 1/2 cup chopped or crushed peanuts
  • Chopped ham or meat from ham bone
  • Optional garnishes/toppings: shredded napa cabbage, jalapeno slices, cilantro, mint, bean sprouts

Directions

  1. In a stockpot, heat canola oil over med-high heat until shimmering. Add onion and saute until translucent, about 3 min. Add garlic and ginger and cook for 1 min, being careful not to burn. Add ham bone and stir to coat with aromatics.
  2. Add water, fish sauce, soy sauce, rice wine vinegar, toasted sesame oil, chili oil, and juice of one lime. Stir to combine, bring to boil, lower heat to simmer for at least 30 minutes.
  3. Meanwhile, soft boil the eggs by doing the following: Bring about 1-2 quarts water to boil in saucepan. Carefully lower eggs (straight out of the fridge) into the boiling water. Reduce heat slightly but maintain gentle rolling boil. Cook for 6 minutes; prepare ice bath to receive eggs. When 6 minutes have passed, remove eggs to ice bath for 3-5 minutes. When cool to touch, peel eggs and set aside.
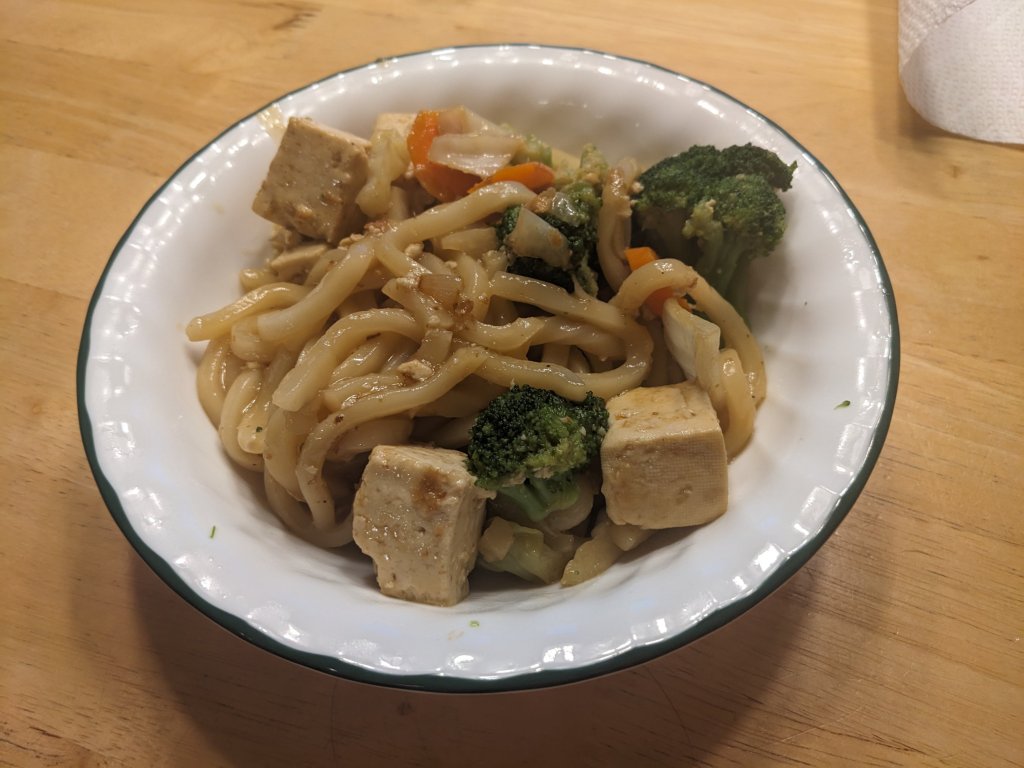
  4. After broth has been simmering for 30+ minutes and you are almost ready to start serving, prepare the instant ramen noodles. If desired, change water in saucepan and once again bring to boil. Add brick of curly noodles to boiling water for 3 minutes (or follow package directions). Discard spice/flavoring packets!
  5. When noodles are done, use slotted spoon or spider to remove noodles from water and place in serving bowl. Then ladle hot broth over noodles.
  6. Top with soft boiled egg(s) split in half. Garnish with sliced scallions, crushed peanuts, chopped ham, and extra limes. Add additional garnishes as desired and enjoy!

GameDay Udon with Tofu

It’s football season and today is the second home game here in town. We spent some time on campus before the game, and then on our way home before the first snap I realized that I didn’t make a plan for cooking dinner at home – which, on a game night, is essential due to the super long wait times and intense traffic around town.

Instead of heading to the store, we decided to make something from what we had at home. Thanks to Costco, we were well stocked with not only mac and cheese but also some cooked udon and extra firm tofu. Since we were already off schedule, I made some mac and cheese to stave off hangry kids and then threw together the GameDay Udon below. Pretty tasty!

Spontaneous GameDay Udon

Ingredients:

  • 1 pkg extra firm tofu (pressed for 30 min)
  • 2 tbsp cornstarch
  • 3/4 tsp garlic powder
  • 1/2 tsp salt
  • 1/4 tsp pepper
  • 1/2 medium onion, chopped
  • 4 small/medium carrots, sliced
  • 1 cup cabbage, chopped
  • 2 bricks cooked Udon or 4 individual packets (~26 oz total)
  • 1/4 or so Japanese Barbecue Sauce or teriyaki sauce
  • 1.5 cup or so of water
  • 2 tbsp crunchy peanut butter
  • 2 tbsp toasted sesame oil
  • Salt and pepper to taste
  • Steamed broccoli, 2 cups (optional)

Directions:

  • Press the tofu: Drain tofu, completely wrap in several paper towels, and place on a plate or small baking sheet. On top of the wrapped tofu, place a heavy bottomed pot or pan to press liquid out of the tofu. Let stand for 30 min.
  • While tofu is pressing, chop up onion, carrots, and cabbage.
  • When tofu is done, slice into one inch cubes. Add to large bowl, along with cornstarch , garlic powder, salt, and pepper. Toss to coat.
  • Heat large skillet (mine is 5qt) to medium high heat with 2+ tbsp neutral oil like canola. Drop coated tofu and cook for 3-4 min.
  • Move tofu to edges of skillet and toss. In the middle, add more oil if needed. Add onion and cook for 3+ min. Add carrots and cook for 2 min. Add cabbage.
  • If needed, deglaze pan with up to 1/2 water.
  • Add Udon noodles and between 1/2-1 cup water. Check cooking/warming directions for udon and add water if needed. Try to break up noodles as possible.
  • Add Japanese Barbecue Sauce and peanut butter. Stir and toss until noodles are soft. Add more sauce to taste. Add broccoli if desired. Adjust salt and pepper as needed. Serve and enjoy!

Stick It To ‘Em Pasta Salad

I’m really scraping the bottom of the barrel for creative recipe names these days… LOL. Just made this pasta salad while in Ohio for the official launch of summer. Very easy, very zesty, really dang good, and along with lots of beautiful veggies, it uses two types of sticks – cheese and beef. Enjoy!

This makes about 3.5 quarts. Great for a side dish at a summer BBQ!

Ingredients

  • 1 lb rotini pasta (plain or tri color
  • 16 oz bottle zesty Italian dressing
  • 1 Tbsp oregano
  • 1 Tbsp basil
  • 1 Tbsp garlic powder
  • 1 red pepper, chopped
  • 1 orange pepper, chopped
  • 1 yellow pepper, chopped
  • 2 cups grape tomatoes, halved
  • 3 or 4 mozzarella string cheese sticks, sliced into disks
  • 2 long beef or salami sticks (about 0.1 – 0.2 lbs total), sliced into disks

Directions

1. Cook pasta according to directions. Drain and rinse with cold water.

2. Whisk salad dressing, oregano, basil, and garlic in large bowl.

3. Add all other ingredients. Toss to coat. Serve and enjoy!

Starting the summer off with some
Stick it to ’em Pasta Salad!

Easy Overnight Crusty Bread

For this past Christmas Eve, we were busy in the late afternoon so we opted for an easy prep/pre-prep dinner… the always crowd-pleasing Chili-mac. Our version consists of our usual chili recipe served over the old stand by, Kraft Macaroni and Cheese. Sometimes you just gotta go with the OGs, you know?

One thing I did forget to pick up at the store before the Christmas Blizzard of 2022 was a good crusty bread to serve with the meal. I googled around and found this recipe on Taste of Home. It looked pretty straightforward, so I went for it. The dough looked soft and lovely when I put it in the fridge after the second rise… but then, when I read the directions more carefully and saw the baking instructions, I realized I didn’t have the required pan to finish it off. Dang it!

In a total audible, I decided to use a different recipe’s baking/finishing technique to get the bread across the finish line. This is always risky, but luckily, thanks to the clear and straightforward directions in the Complete Baking Book for Young Chefs, the bread was a huge hit!

So, here is the mash-up recipe – dough from one, and technique from another.

Easy Overnight Crusty Bread

Ingredients

  • 1-1/2 teaspoons active dry yeast
  • 1-3/4 cups warm water (110° to 115°)
  • 3-1/2 cups plus 1 teaspoon all-purpose flour, divided
  • 2 teaspoons salt
  • 1 tablespoon cornmeal or additional flour

Directions

  1. In a large bowl, dissolve yeast in warm water. Using a rubber spatula, stir in 3-1/2 cups flour and salt to form a soft, sticky dough. Do not knead. Cover and let rise at room temperature 1 hour.
  2. Stir down dough (dough will be sticky). Turn onto a floured surface; with floured hands pat into a 9-in. square. Fold square into thirds, forming a 9×3-in. rectangle. Fold rectangle into thirds, forming a 3-in. square. Place in a large greased bowl, turning once to grease the top. Cover and let rise at room temperature until almost doubled, about 1 hour.
  3. Punch down dough and repeat folding process. Return dough to bowl; refrigerate, covered, overnight.

    *** Change over to the other recipe! ***
  4. On lightly floured surface, turn out dough and knead for 3-4 minutes. Shape into a 6-in round loaf and set aside briefly.
  5. Place an approximately 18×12 sheet of parchment paper on counter. Spray lightly with non-stick cooking spray.
  6. Place loaf on parchment paper, then use parchment paper to lower loaf into a cast iron dutch oven (at least 5-quart). Sprinkle remaining teaspoon of flour over loaf. Cover with lid** and let rise 1.5 – 2 hours. ** Some dutch oven lid handles cannot be used at high temps in the oven; you can unscrew the handle to remove it, and place some crumpled foil in the hole for use during baking.
  7. Adjust oven rack to middle position. Heat to 425 degrees. Using a sharp knife or bread scoring tool, make a slash across the top of the risen loaf. Cover and bake for 30 minutes.
  8. After the first 30 minutes, carefully remove cover from dutch oven (it will be VERY HOT). Bake for another 25-30 minutes until deep golden brown. Remove from oven.
  9. Use parchment paper to lift bread out and place on cooling rack. Cool for at least 1 hour (original recipe recommends 3 hours) and serve.

Chowhound Slow Cooker Chicken Soup (reposted)

So several years ago, I found an excellent recipe for a slow cooker chicken soup that was posted on Chowhound. I’ve probably made it over 25 times. Then this past spring, I went to pull up the recipe… and found Chowhound had shut down!

After a mild freak out, I did find the recipe online and wanted to repost it here. Then of course I realized I already shared it with the pot pie recipe… but in an unnamed fashion. It’s so good, I just want to make sure I (and others!) can find it easily!

Slow Cooker Chicken Soup from Chowhound

Ingredients

  • 8 cups (2 quarts) water
  • 4-5 medium carrots, peeled and cut into large dice
  • 3-4 medium celery stalks, large dice
  • 1 medium yellow onion, small dice
  • 1 bay leaf
  • 1 tablespoon kosher salt, plus more as needed
  • 1/2 teaspoon freshly ground black pepper, plus more as needed
  • 1/2-3/4 teaspoon dried thyme
  • 1 (4- to 5-pound) whole chicken, neck and giblets removed from the cavity
  • 1 tablespoon olive oil
  • 1 tablespoon dried parsley
  • (optional) Egg noodles or rice, prepared per package directions

Directions

  1. Place carrots, celery, onion, bay leaf, and water in a large slow cooker (at least 6 quart).
  2. Mix salt, pepper, and thyme together. Set aside.
  3. Pat chicken dry with paper towels, be sure to remove all giblets and extra stuff. Rub the outside of the chicken with olive oil. Sprinkle salt/pepper/thyme mixture all around, and inside the cavity.
  4. Place chicken in slow cooker, cover and cook on low for 8-10 hours. ** Edited to add: If you want to cook this on the stove, just throw everything in the pot and simmer for about 2.5 hours.
  5. When done, remove chicken, let cool, then remove from bones. Dice the cooked chicken and keep separate from broth/veggies if desired.
  6. Serve remaining soup with noodles or rice and enjoy.

Padawan Pad See Ew

In the year leading up to the pandemic, the kids were starting to *really* get into Star Wars. I’m not totally sure how it got started, other than the adults in the house (and many of our friends) are also really, really into Star Wars, so I’m sure these “grown up” interests were communicated to the kids and reinforced many times. (I mean, as an informal/family learning researcher, I know this is how these things happen, but it’s always cool to try and think about how this stuff works in our every day experiences!)

Once COVID shut things down, and once Disney+ said they were going to debut Hamilton and we signed up for the service, the kids really got into watching many of the Star Wars Lego episodes – as well as the Clone Wars. Currently, they are on Season 3, and they have watched Episodes I-VII of the big movies so far. As such, I thought it was only appropriate to name this dish Padawan Pad See Ew, since it was my first attempt at this Thai favorite. Luckily, there was an excellent recipe at RecipeTinEats, which I only modified a little bit (as seen below). Enjoy!

Ingredients

  • 16 oz wide rice noodle
  • 1/4 cup dark soy sauce (I use Silver Swan)
  • 1/4 cup oyster sauce
  • 4 tsp regular soy sauce (I use Kikoman)
  • 4 tsp white vinegar
  • 4 tsp brown sugar
  • 1/4 cup water
  • 3-4 tbsp sesame oil (any type)
  • 4 garlic cloves, minced
  • 1 lb boneless/skinless chicken thighs, diced (can sub any protein – see note about tofu version below)
  • 2 large eggs
  • 1/2 lb green beans, trimmed and cut into ~4 inch segments (can use Chinese broccoli instead, which is more traditional)

Directions

  1. Look at your noodle package. Figure out how long to cook them, and how. You want to time it so that the noodles are ready to be tossed immediately into the pot. I usually boil some water, turn off the heat, and submerge for about 2-3 min so they are just a bit under done. They are very delicate and break easily/turn to mush if they are overdone! See note in Step 5 about timing.
  2. Make the sauce: mix the dark soy sauce, oyster sauce, regular soy sauce, vinegar, brown sugar, and water all together in a small mixing bowl.
  3. Heat the oil in a 5-quart heavy skillet or wok on med-high heat. Add garlic, saute but be careful not to burn.
  4. Add chicken, cook for about 4 min until mostly cooked through. Push to edges of pan.
  5. Add beans in the middle, cook 3-4 min until crisp tender, push to edges of pan. **Now is probably about when you want to drop your rice noodles in the boiling water. Don’t forget about them!
  6. Crack eggs in the middle and scramble. When cooked through, remove all from pan.
  7. Drain noodles and rinse with cold water. Add to pan. Cover with sauce. Toss until coated.
  8. Add all the rest of the stuff back in, combine and enjoy!

Fried tofu version

This can also be delicious with fried tofu. To make this version, you’ll want to prep the tofu a little differently than the chicken.

Ingredient swaps/adds

  • 14 oz extra firm tofu – instead of chicken
  • 4 tbsp cornstarch
  • 1/2 slightly heaping tsp garlic powder – instead of garlic cloves
  • 1/4 slightly heaping tsp salt

Tofu directions

  1. Start by draining liquid from tofu. Then wrap tofu in three+ layers of paper towel and place under a heavy object (heavy skillet works well) to press liquid. Leave for at least 10 min, longer if possible.
  2. Mix cornstarch, garlic powder, and salt in medium bowl.
  3. Cut tofu into approximately 2 in by 2in by 1/2 in pieces. Toss in cornstarch mixture to coat.
  4. In large skillet, add sesame oil and heat over medium heat.
  5. Place tofu chunks in single layer when pan is hot. Allow crust to form. Use tongs to turn when tofu releases easily. Repeat on all sides as possible. Evacuate to plate lined with paper towels.
  6. Remove tofu from pan, and continue with Step 5 above.
Fried tofu on plate, in a Stonehenge configuration
Sauced noodles, ready for tofu

Enjoy!

Best Baked Burgers (Slider Size)

Sometimes you just need a quick and easy dinner that everyone will love. This recipe has converted my non-burger eating kids to huge fans of homemade sliders. Enjoy!

Ingredients

  • 1.5 – 2 lbs ground beef (85% or 90% lean)
  • 1 tsp garlic powder
  • 1 tsp salt
  • 1/2 tsp pepper
  • 1/4 to 1/3 cup favorite barbecue sauce
  • 1/4 cup breadcrumbs
  • 1 Pkg Hawaiian rolls
  • Tomato slices
  • Cheese slices
  • Other toppings – lettuce, mayo, more bbq sauce, whatever you like!

Directions

  • Preheat oven to 350. Spray a 9×13 baking dish with cooking spray.
  • Combine ground beef with spices, bbq sauce, and bread crumbs. Set aside for 5-10 min.
  • Lightly press into baking dish. Bake for 35 minutes.
  • Meanwhile, split the Hawaiian buns in the middle (so there’s a top and bottom).
  • Let pan rest for 5 minutes, cut into 12-16 squares, and serve with buns and toppings!

Swimmingly Sticky Chinese Chicken

Tonight was the kids’ first time checking out the local swim team. They just rolled off about 6 months of individual lessons and were doing great with their instructor, but I thought the seriousness of an actual team and an actual practice might be pretty intense the first time out. They muscled through it, and even though it was tough, I am hopeful that they will go back for a second night (fingers crossed)!

While the kids were swimming, I thought I’d try making a new recipe for dinner. I modified the Sticky Chinese Chicken Wings recipe from Recipe Tin Eats, using bone-in chicken thighs instead. The dish turned out pretty *swimmingly*, so I thought I’d share it here!

MMMM… Swimmingly Sticky Chinese Chicken!

Ingredients

  • ~4lbs bone-in, skin on chicken thighs
  • Marinade
    • 1/3 cup ketchup 
    • 3/4 tsp sesame oil , toasted
    • 2 2/3 tbsp lemon juice
    • 2 2/3 tbsp Chinese cooking wine (Shaoxing wine)
    • 2 2/3 tbsp soy sauce , light or all purpose
    • 2 2/3 tbsp brown sugar or honey
    • 2 tbsp hoisin sauce
    • 2 tbsp oyster sauce
    • 1 tbsp chilli garlic sauce (very mild – not really much spice at all)
    • 1 tsp garlic powder
    • 1/2 tsp ground ginger
    • 2/3 tsp five spice powder
  • Cooked rice for serving; fresh cut veggies or salad on the side

Directions

  1. Mix marinade ingredients in a 2-cup measuring cup. Stir well to combine.
  2. Place thighs in large bowl, pour marinade over all and toss well. Set aside for 10 minutes – do not marinate for longer than 1 hour.
  3. Preheat the oven to 400 F.
  4. Line baking tray (half sheet pan) completely with foil then with parchment paper.
  5. Shake excess marinade off thighs (but reserve the marinade) and place on baking tray. Chicken pieces can be fairly snug but not on top of each other (use 2 trays if needed).
  6. Bake 40 – 45 minutes, basting with a brush at 20 minutes and 30 minutes, using the reserved marinade and juices on the tray.
  7. Serve with rice and fresh cut cucumber or lightly dressed green salad and enjoy!

Chicago-style baked mostaccioli (or rigatoni)

As some of you know, I grew up in the Chicagoland area, which has such a rich culinary history. Many foods (yes, beyond pizza) have a distinct Chicago-style version that is not easily forgotten. For me, one of those foods is baked mostaccioli, which was occasionally served for lunch both at my daycare and my grade school. It was so good, but it wasn’t a dish we ever made at home.

After some internet searching, I came across this recipe at One Perfect Bite, which is awesome! I made just a few modifications, which are reflected below. Give it a try – you won’t regret it!

Cheesy pasta goodness in a dish

Ingredients

  • 1 tablespoon olive oil
  • 1 pound mild Italian sausage (bulk; if only links are available, remove sausage from casing)
  • 2 15-oz. cans unseasoned tomato sauce
  • 1.25 teaspoon garlic powder
  • 1.25 teaspoon onion powder
  • 1.25 teaspoon dried oregano
  • 1/2 teaspoon ground black pepper
  • 1 pound mostaccioli (or rigatoni, or penne)
  • 3 cups shredded mozzarella cheese (or 2 cups mozzarella cheese and 1 cup Italian blend)

Directions

  1. Preheat oven to 350 degrees F. Spray a 13 x 9 x 2-inch baking pan or ~3.5 quart baking dish with cooking spray.
  2. Heat olive oil in a large dutch oven or skillet (~4 or 5 quart size). Add sausage to dutch oven and brown.
  3. Add tomato sauce, garlic powder, onion powder, oregano and black pepper to skillet. Stir to mix well. Bring contents of dutch oven to a boil, reduce heat and simmer, covered, for 10 minutes.
  4. Meanwhile, cook mostaccioli (or rigatoni or penne) according to package directions. Drain and return to pot.
  5. Add 4-5 ladle-fulls of tomato sauce mixture to drained pasta. Toss to lightly coat.
  6. Place half of cooked pasta in baking pan, making sure bottom of pan is completely covered. Cover with half of remaining tomato sauce mixture and half of cheese. Create another layer using remaining mostaccioli and the last of the tomato sauce and cheese.
  7. Cover baking dish with non-stick foil. Bake for 25 to 30 minutes, or until top layer of cheese is completely melted. If desired, brown under broiler. Serve immediately. Yield: 4 to 6 servings.

Star of Wonder Cinnamon Star Bread

Today is the feast of the Epiphany, when the three kings (the Magi) made it to the manger in Bethlehem. To celebrate, I thought I’d share this recipe, which is so fun to make and looks pretty and fabulous. I made this for the first time for Christmas Eve 2020, starting around 10PM at night and finishing shortly after midnight. It was a good first attempt, but I overcooked it. So this year, I started checking for doneness quite a bit earlier, and it turned out beautifully! (And yes, I did start at 10PM again, but I think that’s just when things get done on Christmas Eve… especially when you have little kids!)

(Cinnamon) Star of Wonder, Star of Night

This star bread technique is awesome, and can be used for many different flavors – from sweet to savory. For a great list of possibilities, check out this post from Sally’s Baking Addiction, scolling about halfway down the post for ideas.

I used the King Arthur’s Cinnamon Star Bread Recipe, and followed pretty much exactly. I’ve reposted below, with some very minor tips/tricks.

Star of Wonder Cinnamon Bread

Ingredients

For the Dough

  • 2 cups (240g) King Arthur Unbleached All-Purpose Flour
  • 1/4 cup (46g) potato flour or 1/2 cup (46g) dried potato flakes (instant mashed potatoes) – definitely worked better with the potato flour, so it’s worth it, even though it’s hard to find
  • 1/4 cup (28g) Baker’s Special Dry Milk or nonfat dry milk
  • 3/4 cup + 2 to 4 tablespoons (198g to 227g) lukewarm water, enough to make a soft, smooth dough
  • 4 tablespoons (57g) unsalted butter, at room temperature
  • 1 teaspoon vanilla extract
  • 2 teaspoons instant yeastjust a little bit more than one envelope
  • 2 tablespoons (25g) granulated sugar

For the filling

  • 1 large egg, beaten
  • 1/2 cup (99g) granulated sugar*
  • 1 tablespoon cinnamon or 2 teaspoons Vietnamese Cinnamon*

Directions

  1. Preparing the dough: Carefully measure and sift together the AP flour, potato flour, and dry milk into the mixing bowl of a stand mixer.
  2. Add the yeast and sugar, mix again.
  3. Add butter and vanilla extract, mix briefly, then add water. Even if the 3/4 cup seems like enough, add at least two tablespoons more. Then mix until it’s not so wet. You may need to switch to the dough hook if the paddle attachment isn’t working anymore.
  4. Turn out the very soft dough on a lightly floured surface and knead for another minute or two until smooth and uniform.
  5. Place in a lightly greased bowl, cover, and place in a warm place to rise, about one hour until nearly doubled in size. It may not rise much if it’s too cold!
  6. Shaping the loaf: Divide the dough into four equal pieces. Shape each piece into a ball, cover the balls, and if you have time, allow them to rest for 15 minutes.
  7. Prepare the filling by mixing the sugar and cinnamon.
  8. Beat the egg in a small bowl and get a brush ready to apply it.
  9. Prepare a large rimmed baking sheet by covering it with parchment paper.
  10. Definitely look at the King Arthur website for pictures for steps 10 – 15. After the dough has rested, on a lightly greased or floured work surface, roll one piece of dough into a 10″ circle. Place the circle on the parchment paper (on the baking sheet), brush a thin coat of beaten egg on the surface, then evenly sprinkle with 1/3 of the cinnamon sugar, leaving 1/4″ of bare dough around the perimeter.
  11. Roll out a second circle the same size as the first, and place it on top of the filling-covered circle. Repeat the layering process — egg, cinnamon sugar, dough circle — leaving the top circle bare.
  12. Place a 2 1/2″ to 3″ round cutter in the center of the dough circle as a guide. With a bench knife or sharp knife, cut the circle into 16 equal strips, from the cutter to the edge, through all the layers.
  13. Using two hands, pick up two adjacent strips and twist them away from each other twice so that the top side is facing up again. Repeat with the remaining strips of dough so that you end up with eight pairs of strips.
  14. Pinch the pairs of strips together to create a star-like shape with eight points. Remove the cutter from the center, and set egg wash aside for use later.
  15. Cover the star and let it rise until it becomes noticeably puffy, about 45 minutes.
  16. Prepare to bake: While the star is rising, preheat the oven to 400°F.
  17. Brush the star with a thin coat of the beaten egg. Bake it for 12 to 15 minutes, until it’s nicely golden with dark brown cinnamon streaks; the center should register 200°F on a digital thermometer.
  18. Remove the loaf from the oven and allow it to cool for about 10 minutes before serving. Dust with confectioners’ sugar and serve warm or at room temperature.
  19. Store any leftover bread, well wrapped in plastic, at room temperature for several days. Freeze for longer storage. 
  20. To reheat bread for serving, place it on a baking sheet and tent it loosely with aluminum foil. Place in a preheated 350°F oven, and warm for about 15 minutes, or until it’s as hot as you like.

Oh – and one last thing. If you are planning to give some of these away as holiday gifts, you may consider making two smaller stars instead of one large one. If you choose this approach, you can divide. the dough into 8 pieces, not 4, and then roll each of the discs out to 7 inches, not 10. Cut, twist, and shape each of the two smaller stars in the same way, on the same baking sheet (as seen below) and voila! Enjoy!!

Twin mini-star breads!